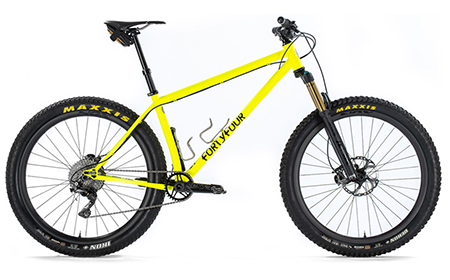
I’ve been playing with the fit and handling on my Huntsman now for a while. I never really liked that traditional stretched out feeling on a road bike and really took to frames that were smaller than what I was “supposed” to be riding. A case in point was back in 1998/99 when I was working at a bike shop in Quakertown, PA just after graduating from PSU: Full Cycle. We were the recently opened sister shop to the Allentown store location. We happened to be a Cannondale dealer and one of the floor models that didn’t ever seem to sell was a red 56cm Team Saeco complete. It was mounted on a trainer for some reason, but one afternoon while the day was slow and repairs were finished up, I stepped onto the 56cm and adjusting saddle height and found that the darn bike fit like a glove. Now, I should have been riding a 58 or 60cm by any traditional measurement. But a 56? Something just clicked and felt right. One of the employee’s had a 57cm blue frame built up that was built by a small builder I want to say and that bike fit even better. She was on the fence of selling it, and ended up keeping it – so I never really was able to put it through its paces. The one caveat with the 56 C-Dale? That was WAY out of my budget and the shop manager wasn’t about to make a deal for me (oh well – I think he tried a few offers, but it was still way out of my budget at the time). So it went I’d occasionally throw a leg over the 56 and pedal for a few minutes on the trainer scheming of ways to get my hands on it. It never came to be. But that little glimpse and window aboard the C-Dale Saeco 56cm started me down a path of riding smaller road frames that felt more upright and compact like a mountain bike frame. And so it was when I built the first Huntsman way back in July of 2008. It was way ahead of the bell curve in terms of “gravel”. I don’t even think that term was even coined yet. I referred to it as a “mountain bikers’ road bike”. That bike and every one since it has been a progression of geometry, handling and finding my fit to the current frame pictured above. Let’s see what makes this one tick and sets it apart from the builds that came before it.
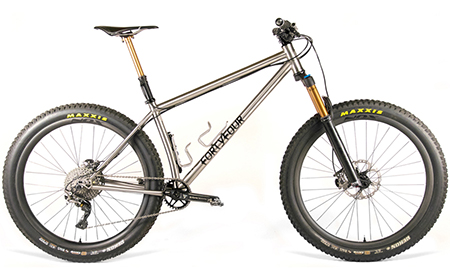
Ironically, the best fitting frame I’ve built myself along the way was a classic 56cm frame. The below bike to be exact:
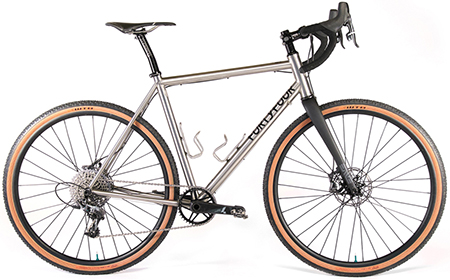
It looks a heck of a lot like the bike pictured above it, doesn’t it? Well, there’s good reason for that. I basically went back and copied it with a slight tweak to top tube length and the addition of a few 3D printed Titanium parts. The story goes as such: I was fiddling with Titanium, getting the hang of it and the lay of the land. Once I felt confident enough with the material, I built the first frame for myself which was a Huntsman.It was a copy of a steel version. Both 56cm frames by traditional standards of measurements. I had settled on a 70°/73° geometry layout (HT/ST) and was fiddling with bottom bracket drop along with subtle tweaks in fit. I always felt a tad stretched out, until on a whim I swapped out my 90mm stem to a 80mm stem and then to a 70mm stem. Suddenly that more upright stance really felt good and “right”. The next version saw a tweak in HT angle to 69° and I layered on some forward geometry attributes, most notably fiddling with front center. The below frame was also equipped to run a dropper:
Over the course of a handful of rides, I found the dropper for the roads I was riding utterly useless to be honest. The longer front center allowed the bike to be leaned into turns quite well and the slacker front end with increased trail created a lot of stability at speed. But something was missing from that previous prototype I really liked and I couldn’t really put my finger on it. So on another whim, I packed up that 2nd Ti prototype and sent it out to be bead blasted at Agave Finishworks this past Spring. Upon its return, I built it back up and instantly knew I had hit the nail on the head regarding the type of road bike I enjoyed riding. It was snappy, responsive and quick when you put down the hammer. It handled well in the rough and at speed and cornered with the best of them. Climbing and descending it handled with ease. So all of this back and forth only to arrive back where I began? Basically! Over time from that first prototype, nothing really changed all that much: 70° HT, 73° ST, 2.75″ / 69.85mm BB drop, 17″ / 431.8mm chainstay length… Literally all the same between No. 1 and the latest version I just finished with a few minor exceptions. But I keep coming back to this same geo after playing around with small attributes. So it appears I hit the mark from the onset if I keep coming back to that same basic set up. Optimizing and playing with tube diameters has also been in there along the way and understanding how they have an effect on handling and ride quality. But the below build is where I’ve landed because, well… this is exactly the kind of road bike I want to ride (and I seem to keep coming back to it)!
This new prototype differs in tube diameters with a 1.625″ / 42mm down tube and 1.375 / 34.9mm top tube over the previous version sporting a dropper which had a 1.5″ / 38.1mm DT and 1.25″ / 31.8mm TT. But the biggest change was designing to my own specifications a yoke and flat mount part to be 3D printed in Titanium. Those went through a few rounds before I landed on the finalized designs. After working with both, the yoke should be ready to go while the flat mount part will see a few small revisions to allow for a bit more welding elbow room and updating the depth of where the flat mount bore sits to use stock hardware of a specific length. Here’s the yoke freshly printed by Silca:
You can see the spline that runs through its entirety to add a layer of stiffness the previous version was lacking:
And here’s a side by side comparison of the current and previous road yoke designs as printed. You can really see how much they changed between the two iterations just from this photograph.:
There were additional revisions in how the tube and socket interacted and was executed in addition to accounting for shrinkage post print. Took a few tries but I think I have that part of the process ironed out. Here you can see both parts from above and how they come together with Paragon’s dropout and T47 bottom bracket shells:
And then in the final bead blasted complete (Thanks Peter @ Agave Finishworks!):
The next phase of the flat mount part is to decide if I want to integrate that with a dropout along with further refinement of details. When welding that part, the dropout and chainstay pulled it a bit in board, so I had just enough adjustment to align properly with a rotor post weld. If I don’t integrate the dropout, I may end up possibly making the flat mount part that is non-integrated with a dropout only have a set of M5 holes that are centered in the flat mount studs and modifying a bit of tooling to work off of that set up. Then post tack and weld of the part, I machine the surfaces flat and slot the flat mount studs post print. THAT will be flat and to spec. no matter what if I choose to go that route. I can then also add a bit more float in either direction of the flat mount. Integrating the dropout seems to be the most direct no-fuss route but that makes for a more expensive and complex part and at that junction, I might as well design my own drive side dropout. We shall see as I’m still mulling those options over.
That aside, Titanium can really be tuned depending on tube diameter to aid in ride quality and characteristics. More so than steel I’ve found. Tire size and pressure have an equally big effect on ride quality and ride characteristics. There’s a fine balance of too big and too much rolling resistance but really smooth sailing over rough terrain vs too small and you’re rumbling over terrain and getting kicked around but acceleration is quite good and rolling resistance is low. That window I’ve found is in the 37-42mm range for the type of road bike and terrain I enjoy riding. 35mm and you’re just getting beat up and knocked around which translates to a lack of control and confidence at speed. 45-50mm, boy that rides like a dream but the bike feels like a slug on the flats. So there’s that interesting window of 37mm, 40mm, and 42mm tires that just make the bike sing in many situations. I’ve really been digging WTB’s casing and tread patterns and their ease of setting up tubeless. The 37mm Riddler I really want to try while I feel the Nano 40mm and Resolute 42mm are perfect tires for their intended use. 40mm being the all-arounder where rolling resistance is balanced nicely with its ability to get up to speed but handle rougher terrain without feeling too monster-crossy. I’d love to see a 40mm Resolute honestly. But the 42mm Resolutes I’m running above have actually stretched out to a cool 44mm width on my Nox Teocalli which have a 22mm internal rim width (that’s a key measurement for determining how wide your tire will become). You can make out the 42mm Resolutes in this image:
Handling wise, as I’ve mentioned above, I’ve appeared to settle on a 70/73 combo after going back and forth on many bikes and trying different setups. 69° handled well in the rough and down hill, but overall, the longer front center and hence longer wheelbase of that previous bike had me missing a feeling of snappiness and quickness that after coming back to a previous prototype, building it back up and riding it for a few months, had me connecting a few preferential dots. Needless to say, this is how I’ve been building my client bikes all along and although I was trying new things on my personal builds, clients kept singing the praises of that geometry setup. So I came back to it and couldn’t be happier. Funny how that worked out! Here you can see the 2.125″ diameter T47. The wall thickness of this bottom bracket is ever so slightly thicker than a previous 2″ version Mark was making and is a joy to weld and a heck of a lot easier to keep round post weld (which also makes reaming not a task by itself). This one actually was just about perfectly round when I finished welding to my relief.
You can also see the internal routing for the rear brake in the above – another small detail in the list of details to keep things clean but exterior cable routing to keep things practical so clients and myself can swap out between a 1x or 2x rather quickly. But what I’ve found overall in mountain biking handling does apply to the road end of the spectrum. The same principles apply basically but on the road, I’ve been finding that its even more subtle than on the mountain side. Pushing things too far makes the bike exceed expectations for a given attribute to the detriment of a whole host of others where as with a mountain bike, you can make larger sweeping changes and other attributes aren’t as negatively effected (read it becomes biased to a task but still performs rather well in another – ie descending vs ascending and HT angle, front center, offset, trail and rake). Pushing the front end too far on a road bike just biased it outside of the spectrum of attributes I was after in a road bike and hence when I returned to basically a 90’s mountain bike setup, the bike just plain performed for what I was intended to ride: Gravel roads with pavement connection points and 6th class/jeep road jaunts. Once the road progressively becomes essentially a trail, I’m going to be looking to ride my mountain bike. But when I’m on my road bike, I’m looking to ride roads.
If you missed it, here’s the previous posts discussing geometry and handling. And for those who want to see more of the build above of the latest prototype, here’s that bikes build folder via Flickr. So there you have it. It really does come down to details and ironically sometimes, you’ll go full circle when it comes to your path to building the better mousetrap. That is basically what has happened to me with regards to my personal Huntsman. It appears I hit the mark from the start but wouldn’t have known that had I not gone down the path of all the prototypes that proceeded the original. Till next time, keep the rubber side on the ground and the good times going.

New Road
I’ve been playing with the fit and handling on my Huntsman now for a while. I never really liked that traditional stretched out feeling on a road bike and really took to frames that were smaller than what I was “supposed” to be riding. A case in point was back in 1998/99 when I was working at a bike shop in Quakertown, PA just after graduating from PSU: Full Cycle. We were the recently opened sister shop to the Allentown store location. We happened to be a Cannondale dealer and one of the floor models that didn’t ever seem to sell was a red 56cm Team Saeco complete. It was mounted on a trainer for some reason, but one afternoon while the day was slow and repairs were finished up, I stepped onto the 56cm and adjusting saddle height and found that the darn bike fit like a glove. Now, I should have been riding a 58 or 60cm by any traditional measurement. But a 56? Something just clicked and felt right. One of the employee’s had a 57cm blue frame built up that was built by a small builder I want to say and that bike fit even better. She was on the fence of selling it, and ended up keeping it – so I never really was able to put it through its paces. The one caveat with the 56 C-Dale? That was WAY out of my budget and the shop manager wasn’t about to make a deal for me (oh well – I think he tried a few offers, but it was still way out of my budget at the time). So it went I’d occasionally throw a leg over the 56 and pedal for a few minutes on the trainer scheming of ways to get my hands on it. It never came to be. But that little glimpse and window aboard the C-Dale Saeco 56cm started me down a path of riding smaller road frames that felt more upright and compact like a mountain bike frame. And so it was when I built the first Huntsman way back in July of 2008. It was way ahead of the bell curve in terms of “gravel”. I don’t even think that term was even coined yet. I referred to it as a “mountain bikers’ road bike”. That bike and every one since it has been a progression of geometry, handling and finding my fit to the current frame pictured above. Let’s see what makes this one tick and sets it apart from the builds that came before it.
Ironically, the best fitting frame I’ve built myself along the way was a classic 56cm frame. The below bike to be exact:
It looks a heck of a lot like the bike pictured above it, doesn’t it? Well, there’s good reason for that. I basically went back and copied it with a slight tweak to top tube length and the addition of a few 3D printed Titanium parts. The story goes as such: I was fiddling with Titanium, getting the hang of it and the lay of the land. Once I felt confident enough with the material, I built the first frame for myself which was a Huntsman. It was a copy of a steel version. Both 56cm frames by traditional standards of measurements. I had settled on a 70°/73° geometry layout (HT/ST) and was fiddling with bottom bracket drop along with subtle tweaks in fit. I always felt a tad stretched out, until on a whim I swapped out my 90mm stem to a 80mm stem and then to a 70mm stem. Suddenly that more upright stance really felt good and “right”. The next version saw a tweak in HT angle to 69° and I layered on some forward geometry attributes, most notably fiddling with front center. The below frame was also equipped to run a dropper:
Over the course of a handful of rides, I found the dropper for the roads I was riding utterly useless to be honest. The longer front center allowed the bike to be leaned into turns quite well and the slacker front end with increased trail created a lot of stability at speed. But something was missing from that previous prototype I really liked and I couldn’t really put my finger on it. So on another whim, I packed up that 2nd Ti prototype and sent it out to be bead blasted at Agave Finishworks this past Spring. Upon its return, I built it back up and instantly knew I had hit the nail on the head regarding the type of road bike I enjoyed riding. It was snappy, responsive and quick when you put down the hammer. It handled well in the rough and at speed and cornered with the best of them. Climbing and descending it handled with ease. So all of this back and forth only to arrive back where I began? Basically! Over time from that first prototype, nothing really changed all that much: 70° HT, 73° ST, 2.75″ / 69.85mm BB drop, 17″ / 431.8mm chainstay length… Literally all the same between No. 1 and the latest version I just finished with a few minor exceptions. But I keep coming back to this same geo after playing around with small attributes. So it appears I hit the mark from the onset if I keep coming back to that same basic set up. Optimizing and playing with tube diameters has also been in there along the way and understanding how they have an effect on handling and ride quality. But the below build is where I’ve landed because, well… this is exactly the kind of road bike I want to ride (and I seem to keep coming back to it)!
This new prototype differs in tube diameters with a 1.625″ / 42mm down tube and 1.375 / 34.9mm top tube over the previous version sporting a dropper which had a 1.5″ / 38.1mm DT and 1.25″ / 31.8mm TT. But the biggest change was designing to my own specifications a yoke and flat mount part to be 3D printed in Titanium. Those went through a few rounds before I landed on the finalized designs. After working with both, the yoke should be ready to go while the flat mount part will see a few small revisions to allow for a bit more welding elbow room and updating the depth of where the flat mount bore sits to use stock hardware of a specific length. Here’s the yoke freshly printed by Silca:
You can see the spline that runs through its entirety to add a layer of stiffness the previous version was lacking:
And here’s a side by side comparison of the current and previous road yoke designs as printed. You can really see how much they changed between the two iterations just from this photograph.:
There were additional revisions in how the tube and socket interacted and was executed in addition to accounting for shrinkage post print. Took a few tries but I think I have that part of the process ironed out. Here you can see both parts from above and how they come together with Paragon’s dropout and T47 bottom bracket shells:
And then in the final bead blasted complete (Thanks Peter @ Agave Finishworks!):
The next phase of the flat mount part is to decide if I want to integrate that with a dropout along with further refinement of details. When welding that part, the dropout and chainstay pulled it a bit in board, so I had just enough adjustment to align properly with a rotor post weld. If I don’t integrate the dropout, I may end up possibly making the flat mount part that is non-integrated with a dropout only have a set of M5 holes that are centered in the flat mount studs and modifying a bit of tooling to work off of that set up. Then post tack and weld of the part, I machine the surfaces flat and slot the flat mount studs post print. THAT will be flat and to spec. no matter what if I choose to go that route. I can then also add a bit more float in either direction of the flat mount. Integrating the dropout seems to be the most direct no-fuss route but that makes for a more expensive and complex part and at that junction, I might as well design my own drive side dropout. We shall see as I’m still mulling those options over.
That aside, Titanium can really be tuned depending on tube diameter to aid in ride quality and characteristics. More so than steel I’ve found. Tire size and pressure have an equally big effect on ride quality and ride characteristics. There’s a fine balance of too big and too much rolling resistance but really smooth sailing over rough terrain vs too small and you’re rumbling over terrain and getting kicked around but acceleration is quite good and rolling resistance is low. That window I’ve found is in the 37-42mm range for the type of road bike and terrain I enjoy riding. 35mm and you’re just getting beat up and knocked around which translates to a lack of control and confidence at speed. 45-50mm, boy that rides like a dream but the bike feels like a slug on the flats. So there’s that interesting window of 37mm, 40mm, and 42mm tires that just make the bike sing in many situations. I’ve really been digging WTB’s casing and tread patterns and their ease of setting up tubeless. The 37mm Riddler I really want to try while I feel the Nano 40mm and Resolute 42mm are perfect tires for their intended use. 40mm being the all-arounder where rolling resistance is balanced nicely with its ability to get up to speed but handle rougher terrain without feeling too monster-crossy. I’d love to see a 40mm Resolute honestly. But the 42mm Resolutes I’m running above have actually stretched out to a cool 44mm width on my Nox Teocalli which have a 22mm internal rim width (that’s a key measurement for determining how wide your tire will become). You can make out the 42mm Resolutes in this image:
Handling wise, as I’ve mentioned above, I’ve appeared to settle on a 70/73 combo after going back and forth on many bikes and trying different setups. 69° handled well in the rough and down hill, but overall, the longer front center and hence longer wheelbase of that previous bike had me missing a feeling of snappiness and quickness that after coming back to a previous prototype, building it back up and riding it for a few months, had me connecting a few preferential dots. Needless to say, this is how I’ve been building my client bikes all along and although I was trying new things on my personal builds, clients kept singing the praises of that geometry setup. So I came back to it and couldn’t be happier. Funny how that worked out! Here you can see the 2.125″ diameter T47. The wall thickness of this bottom bracket is ever so slightly thicker than a previous 2″ version Mark was making and is a joy to weld and a heck of a lot easier to keep round post weld (which also makes reaming not a task by itself). This one actually was just about perfectly round when I finished welding to my relief.
You can also see the internal routing for the rear brake in the above – another small detail in the list of details to keep things clean but exterior cable routing to keep things practical so clients and myself can swap out between a 1x or 2x rather quickly. But what I’ve found overall in mountain biking handling does apply to the road end of the spectrum. The same principles apply basically but on the road, I’ve been finding that its even more subtle than on the mountain side. Pushing things too far makes the bike exceed expectations for a given attribute to the detriment of a whole host of others where as with a mountain bike, you can make larger sweeping changes and other attributes aren’t as negatively effected (read it becomes biased to a task but still performs rather well in another – ie descending vs ascending and HT angle, front center, offset, trail and rake). Pushing the front end too far on a road bike just biased it outside of the spectrum of attributes I was after in a road bike and hence when I returned to basically a 90’s mountain bike setup, the bike just plain performed for what I was intended to ride: Gravel roads with pavement connection points and 6th class/jeep road jaunts. Once the road progressively becomes essentially a trail, I’m going to be looking to ride my mountain bike. But when I’m on my road bike, I’m looking to ride roads.
If you missed it, here’s the previous posts discussing geometry and handling. And for those who want to see more of the build above of the latest prototype, here’s that bikes build folder via Flickr. So there you have it. It really does come down to details and ironically sometimes, you’ll go full circle when it comes to your path to building the better mousetrap. That is basically what has happened to me with regards to my personal Huntsman. It appears I hit the mark from the start but wouldn’t have known that had I not gone down the path of all the prototypes that proceeded the original. Till next time, keep the rubber side on the ground and the good times going.