When I built my first bike, I pretty much didn’t have much of an understanding of geometry, handling and what made both click. I basically plucked a few numbers based on riding experience up to that point and then slowly, over many iterations, a lot of trial and error, riding, building and repeating, things started to coalesce into a cohesive understanding of geometry, handling and performance. That first bike was 10 years ago. It’s still a journey where bits and pieces take shape, break down or are thrown out the door only to be reassembled into a greater understanding. Consider that my journey, or your journey for that matter, will constantly be evolving, we’ll always be learning, and constantly honing our craft for a greater understanding that coalesces into what we know to be geometry. But before I delve into a deep download of what I’ve learned about geometry over the past 10 years, first a glossary of terms needs to be laid bare as simply as I can muster. So here goes from the front wheel to the rear wheel of a bicycle. I’ve included the common measurements in addition to a few that I use and advocate for to be added into the vernacular.
Geometry : Glossary of Terms
Head Tube Angle: The angle measured in degrees of the head tubes center line as it bisects a horizontal line defined as the axle centerlines.
Axle to Crown: Distance measured along the head tube centerline from crown race seat to front axle centerline. (Determine axle to crown and account for sag when designing a hardtail.)
Sag: Percentage of fork travel subtracted from axle to crown when fork is weighted by rider in a seated position.
Rake: This is the angle measured in degrees between the steering axis and a vertical line drawn from the front axle centerline. (In the past, this has been confused with offset in the bicycle world. Offset is offset. Rake is NOT offset.)
Offset: The distance measured perpendicularly from the steering axis to the centerline of the front wheel. (DO NOT REFER TO THIS AS RAKE)
Trail: The horizontal distance measured between where head tube centerline/steering axis and the perpendicular vertical distance of front axle centerline intersect with the ground. (More rake = more trail. Less rake = less trail. Simple, huh?)
Front Center: The distance from bottom bracket center to the front axle centerline (I’ve seen this measured as a pure horizontal distance and/or measured as the hypotenuse of the imaginary triangle formed by the bottom bracket and front axle with the axle centerline).
Reach: The horizontal distance from the center top of the head tube to the bottom bracket center.
Stack: The vertical distance from the bottom bracket to the top of head tube center.
Setback: The horizontal distance from bottom bracket center to seat tube centerline at the vertical and horizontal terminus of reach and stack. (I’d advocate for this to accompany reach and stack – and its a term I’ve used to explain this important missing measurement).
Cockpit: Center of the handlebar/stem connection measured horizontally to tip of saddle.
Nose: Horizontal distance from saddle tip to saddle rail / seat post clamp center.
Saddle Setback: Horizontal distance from seat post centerline to saddle rail / seat post clamp center.
Effective Top Tube Length: Horizontal distance measured between the top of the head tube’s centerline and seat tube centerline.
Actual Top Tube Length: Distance measured along top tube centerline where it intersects with seat tube centerline and head tube centerline.
Seat Tube Angle: Angle of seat tube centerline with horizontal centerline between front and rear axles
Saddle Height: Distance measured along seat tube centerline from bottom bracket center to horizontal top of saddle. (Often there is a valley from tip to tail on a saddle so be sure to lay something flat across the saddle to achieve this measurement more accurately).
Bottom Bracket Drop: The vertical distance from the axle center line perpendicular to the center of the bottom bracket.
Bottom Bracket Height: The vertical distance from the bottom bracket center perpendicular to the ground.
Chainstay Length (or rear center): Horizontal measurement from bottom bracket center to rear axle centerline. (When measuring this distance for a singlespeed, its paramount to measure this as the hypotenuse to optimize chain length and dial in tension so the sliders stay as slammed as possible to allow for chain growth.)
Wheelbase: Horizontal measurement from front axle to rear axle centerlines.
RAD / Rider Area Distance: The 2D distance projected and measured between the bottom bracket and grips.
Ok, now that we’re all on the same page, we can roll up our sleeves and set about the work of geometry, handling and performance of a bicycle. Road bikes that see a lot of mixed terrain, aka gravel bikes, share many of these attributes, and much of this knowledge can be applied to those same bikes. But for the sake of the conversation I’ll be solely focusing on geometry as it relates to a 29 inch mountain bike. And once again, to try and make this as simple and relatively straight forward to understand, I’m going to talk about the bike from front to rear and then discuss how the front and rear of the bike interact with one another and how each of the above terms defines and influences handling. There is one thing I can’t stress enough: No one single element above should be considered in isolation. They are very dynamic and have effects on one another that will influence how the entire bike handles. Small changes in design can have very large effects out on the trail. So you must have a handle on each of these pieces of the puzzle and how they interact with one another and again, to be repetitive: Do not look at them in isolation. So let us begin!
Broad Strokes
I always start a mountain bikes design with the riders fit which I see as the primary set of parameters. These are the 4 points in space that triangulate the rider: Cockpit, nose, saddle length and saddle height. The next set of parameters I address is riding style, intended use and terrain. These provide a clear path forward to begin addressing the physical geometry of the bicycle that will enhance the clients riding style, fit their intended use and address their chosen terrain so that the bike is an extension of the rider. Some times I will request photos of the clients existing bike from the side and/or photos of them seated in a “JRA” pedaling position if they cannot physically come to the shop. Small things I look for and confirm from their fit measurements are saddle to bar drop, position of saddle (too far forward or too far back) and stem length. All of these data points provide guardrails for the design process but also create a clear vision for the bikes purpose that drives the design. I begin by first laying out chainstay length, bottom bracket drop, seat tube centerline, seat tube angle, and saddle height. Bottom bracket, dropouts, chainstays and a preliminary seat tube length are laid into the drawing. Dimensions of saddles are dropped in with saddle centered on seat post rails. I now move across and establish cockpit length. Stem length, fork axle to crown (A2C) and offset have been pre-chosen based on the customers component spec and preference, so I’ll know what fork and stem are being spec’d and what the offset and A2C is in addition to stem length (and angle if applicable). I typically shoot for the bars and saddle to be just about dead even with no drop or around 1″ / 25.4mm of drop. Depending on the height and inseam of the rider, some times I will actually use A2C of the fork to raise or lower the front end of the bike a hair to get bar height optimized in relation to the saddle. I now drop down and establish head tube angle, lay in A2C accounting for sag and offset and lastly account for headset stack. Head tube length is now optimized and any additional stack between headset and stem is established. From here I now can optimize seat tube (ST) length based on the riders inseam and standover to establish top tube (TT) angle, location, and their connection (typically I leave 1.25″ / 31.8mm between the top of the ST to the top of the TT). The last two steps are optimizing seat stay angle and connection location to the seat tube, and down tube diameter, angle and location depending on rider weight and riding style. All throughout this process, the following points are being weighed throughout the design process and are primary drivers in my choice of geometry data points:
· Head tube angle, rake, trail, and offset all play a unique role in handling and they really riff off of one another. A change in one effects another down stream. Increase rake and you increase trail (or slacken head tube and you increase trail). Decrease rake and you decrease trail (or steepen head tube angle and you decrease trail). Trail is the ability for the front wheel to self-center itself. More trail equals more stability and composure at speed. An increase in offset lowers the front end of the bicycle. A decrease in offset raises the front end of the bicycle.
· Stem length and hand positioning relative to the steering axis add a layer of control or lack of control of the front end of the bicycle. The levers that the distance from rear tire contact patch to hand position and hand position to pedal contact have an effect on handling as well. These also effect the riders ability to pick up and loft the front end, how easy it is to compress the bike and load the front end as well as weight the front tire to gain traction into turns while pushing through the pedals either to bunny hop or carve through a turn. Basically these levers can be used to throw the bike around on the ground or in the air. Hands too far out in front of the steering axis require more rider input with weight distribution biased out in front of the bicycle, while hands close to or exactly at the steering axis requires less rider input. This is long stem, short front center vs short stem long front center. The tipping point being too long of a stem and your hands are too far forward of the steering axis combined with too steep of a head angle making control and handling more difficult (and sometimes a tad twitchy). The converse can also be true: Too slack and hands are too far behind the steering axis and odd things begin to occur with handling and control that are akin to having your hands too far out in front of the steering axis – that ones a bit tougher to explain I will add! So theres’s a sweet spot of stem length and hand positioning relative to the steering axis that optimizes how both the bike can be handled and how easy/hard the bike is to control at speed and/or through rough terrain.
· Bottom bracket height (BB height) is optimized by choosing bottom bracket drop (BB drop). Basically as low as possible without being a pedal striking nightmare. Sometimes I make compromises in BB drop to accommodate fit issues with height, inseam and saddle to bar drop. These are small choices. 2.375″ vs 2.25″ for example in drop in combination with a slight increase in fork trail or increase/decrease in offset. A small change in fit often results in a better performing bike because the bike now fits that much better and is that much more of an extension of the rider . However, these choices come with experience and nuance so there is a bit of knowing just how much to push these numbers will result in the balance you’re seeking. BB drop helps to establish the rider center of gravity (COG or CG). BB Height is another way of looking at this, but this also can be effected by tire pressure and tire size choice and often is dynamic if the bike is designed around a suspension fork (which is constantly moving up and down which means the head tube angle is steepening under braking or slackening under acceleration). BB drop choices also have an effect on how the bike will corner, carve and effects the “feel” of the bike over terrain and through turns.
· Chainstay length is a fun parameter. Really short and the bike is a bunny hopping and manualing machine but to the detriment of ride quality. You essentially design out any resiliency in the material and trade that for stiffness. Too long and the bike begins to be too sluggish and a chore to pick up and over obstacles in a bunny hop or manual. As a designer, I’m constantly looking to optimize this parameter for its intended use and terrain. Often my mountain bikes are singlespeed’s, so a lot of chainstay length can primarily be driven by optimizing chainstay length both slammed if in geared mode or tensioned in singlespeed mode. However, I’ve come to know over time, and I’ll expand on this in a bit, that as front center has grown, rear center must follow. The trick to this puzzle is by how much chainstay length needs to grow so you optimize for use and terrain but you maintain handling characteristics that enhance its use while optimizing performance for its intended terrain. The balance of all day comfort with ample power transfer and lateral stiffness that delivers consistent traction is the riddle chainstay length helps to unlock.
· Front center and wheelbase play a large role in ride quality. Balancing front and rear center distribution is key. I primarily see these numbers play out as a result of all the other decisions I’ve made with the design of the bike up to this point. If front center seems a tad too long for a given riders physicality at this point, I’ll make adjustments in reach and stem length or further optimize cockpit length to tame this number. Another parameter I’m looking at is head tube angle. In rare cases I may slacken or steepen this number to either lengthen or shorten front center and wheelbase but its a rare occasion that this occurs (and I’m also balancing the factors I just mentioned in addition to this one). This has a direct effect on wheelbase and 9 times out of 10, basically at this point the bike I’ve designed based on all of the previous decisions is a bike that finally fits and is proportionate to the rider. Again, every geometry point has an effect on the sum total and a well fitting bike is a bike that performs for the rider. So sometimes fit will trump geometry.
· The last piece of the puzzle is RAD or “rider area distance”. This is the distance measured between the bottom bracket center and the grips. What I’m currently focusing on and will continue to put more time into is the influence RAD has on handling and your ability to move the bike and/or move with the bike. Optimizing this number with all of the above is my next stepping stone. An interesting data point I just discovered too. I measured RAD across all 3 of my current mountain bikes (the Single Speed and both FS prototypes) and its identical: 33.5″ / 850.9mm.
Into the weeds but hopefully not into the cabbage…
A little background behind 4 formative hardtail’s that set me on a collision course with building my own frame. My first mountain bike was a 1991 Trek 830 Antelope. Florescent yellow with black paint splatter. Searching through old catalogs and databases, my first mountain bike sported a 69.5° head tube angle, 72.5° seat tube angle, 429mm chainstay length, offset was 46 with a wheelbase of 1054mm. I replaced the Trek 830 with a 1996 Specialized Stumpjumper M2 that a shop parted out since it was a left over from a previous season. I test rode a 17″ M2 in red, but it was just a tad too small so I ended up with a 19″ in this deep matte blue kinda plum color. Again, searching through online databases, head angle was 71°, seat tube was 73°, offset was 42mm, wheelbase was 1052.7mm, 430mm rear center and they actually gave a front center measurement of 625.9mm. My next bike was a 1998 Voodoo Bizango. I loved this bike. Reynolds 853. A dreamy schwinn stingray-like green they called “serpent green”. I can’t locate the Bizango’s geo, but I seem to recall maybe it was in the 70/71° HT angle range, with 73° seat tube? But just after I ripped the head tube off of this in Emmaus on Christmas break (a fateful afternoon – I was heartbroken and crestfallen), I rebuilt my Stumpjumper and began the search for a new steel frame. I remember calling a shop that was a Voodoo dealer immediately and got the word that they had JUST filed for bankruptcy. How about that for bad luck?
Once back at school, I would check craigslist daily for months. And low and behold my holy grail of frames popped up one afternoon. I ran back to my apartment and immediately called the seller of a 17″ 1994 Eastern Woods Research (EWR) Original Woods frame in gloss black with yellow vinyl decals. Serial Number R-HE-119-7-94. (Jay DeJesus later decoded this for me: 1=nothing, 1=1st prod. run, 9=9th in batch, 7=July, 94=1994). A week later, I had my holy grail of bicycle frames. (I think I paid 150-200 simoleons for that frame!) Head angle of 72°, seat tube was 73.5°, 15.9″ chainstay length, bottom bracket height of 12.5″ and a top tube length of 22.375″. It had seen a lot of hard use, but I built that bike up and man did it sing out on the trail. As the 1993 catalogue states: “The ride is as unique as the look – short rear, long front, high B.B., and aggressive angles make it quick, nimble in singletrack, easy to jump, a BLAST to ride.” Sweeter words never dripped from the page. The Original Woods was WAY ahead of its time.
Looking over the above numbers, things started sorta slack (69.5° in 1991? NORBA standard geo was 71/73!), then slowly started to creep ever more steep until I connected the dots to the EWR, which actually was quite steep. Now I’m not saying this geo was better or worse than current forward geometry is now, but the progression of all these numbers started to formulate an experience out on the trail I sought, and the description of the Original Woods Frame has always stuck with me. The feeling I got when I rode that bike has never left me either. That was my benchmark: If I could recreate that same feeling I had on the EWR with my own bikes, then I was on to something. And it would take me a full 10 years of “Build, Ride, Repeat” to arrive at that location. I wanted an all around mountain bike that could climb, descend with the best of them but jib off of all points in between. According to my opinion: the spaces between the ascents and descents are where the magic is hidden. This is where you want that big BMX bike in the woods to show up so you can bunny hop off of rocks, stumps, roots and other small trail features. But to get there, I had to sort everything out through trial and error. And just for comparison sake, my current bike matched up to that EWR is as such: 66° head tube angle, 2.5″ of bottom bracket drop, 16.9″ / 429.3mm chainstay length, 31.64″ / 803.7mm front center, and a 48.54″ / 1232.9mm wheelbase. And just to note, that is a whopping 5.84″ difference in wheelbase between the first prototype to the last one I’m currently riding. (Add close to 2″ of wheel base for the Snakedriver…). Out of the 20 prototypes I’ve built for myself, these three were pivotal (Readers Note: The numbers in the parenthesis are headtube angle/seat tube angle).
The first mountain bike I built with the help of master framebuilder Ted Wojcik (69/73 – this frame is on the wall in the shop – I may have to build this up just for kicks at some point!):
Prototype #11 (70/73):
And finally this bike, prototype #17, was the one that got me really thinking (67/75):
The above bike was so eye opening, I immediately built an identical version in Titanium. What had happened slowly over time was I was growing front center and slackening head tube angle. The more I slackened head angle, the more front center grew and the more those two changed, I started noticing just how much faster I could go and simultaneously how much more control I had in addition to how much stability the bike possessed. Basically I was increasing rake. And as you increase rake, you increase trail.
Or to look at it another way: slackening head tube increases trail while steepening head tube angle decreases trail. Trail directly effects handling in a specific way: The longer the trail, the more the front wheel wants to seek a straight line and self-center. The shorter the trail, the more twitchy the front end begins to be and the quicker the effects of steering become. Conversely, the longer the trail number, the more you can begin to lean the bike vs steering the bike.
While I was playing with these numbers and angles, I was also fiddling with my fit. Saddle height has always hovered in the 30.5-31″ / 774-787mm range while my cockpit length was the one that was drastically shifting from long to short over time. That number was in flux for a while stretching all the way out to 22″ / 559mm and then gradually bringing it back to its current 20.5″ / 521mm dimension. The other factor I was playing with that can dramatically effect front center: Stem Length. If you keep your cockpit (basically your fit) the same across multiple bikes, but reduce the stem length, the front wheel must move forward while the top tube length increases to make up for the amount of stem length you’ve removed to keep that cockpit length the same. If you’re dealing with a reach number, you technically have to increase reach to make up for that loss of stem length if the handlebars stay in the same place. So keeping an eye on my cockpit length and triangulating my contact points in space fit wise with a slacker head angle combined with a shorter stem resulted in an increase of trail and an increase of front center. This resulted in the bike being incredibly stable at speed, composed through rough sections, but if you made a mistake either on flat trail, down hill or up, less rider input was required for self-correction of the front wheel. Remember that longer trail number wants to self-center itself. Those 3 factors aided in composure and confidence at higher speeds with the ability to really lean and carve the bike through turns however without the detriment to technical handling in techy singletrack.
Along with this slackening of the head angle, increasing trail and lengthening front center, I was shortening my stem. One factor I started taking notice to on the drawing board was the relationship of where the stems vertical centerline bisected with the steering axis in relation to the bottom of the head tube and where my hands were in relationship to the steering axis. The longer the stem, the further out in front of the steering axis my hands were and the further in front of the steering axis the stem center point intersected with the steering axis as well. This was incredibly apparent with those 4 early bikes (each sported something like a 90-130mm stem). But back to the drawing board, when I kept my cockpit length and fit the same, but designed around a shorter stem and much slacker head angle, that same vertical intersection of stem clamp center and steering axis with relation to the head tube bottom? The intersection point was behind the head tube bottom and the closer my hands were to the steering axis. This resulted out on the trail to greater control and more responsiveness with relation to head angle, front center and trail. I no longer had to “steer” the bike. I was leaning the bike to turn and using my tires a heck of a lot more because I could now confidently lean without feeling a sense that the front wheel was going to snap out from under me. Again an increase in trail, an increase in front center, a slackening of head tube angle and a shortening of stem length while keeping cockpit relatively the same lended more control and composure at speed.
All this time through 19 prototypes I had left bottom bracket drop at 2.25″ / 57.15mm. Very early on I fiddled with this number and found a sweet spot of just enough drop so bottom bracket height wasn’t too low resulting in few pedal strikes but not too high where I felt pitched up and forward with too much weight on the front wheel. I was centered and “IN” the bike. However, all along I knew from Ted Wojcik that you can quicken steering by lowering bottom bracket height (which lowers your center of gravity a touch and hence allow the bike to corner quicker). So how much can I push this before it becomes a pedal basher was the question to answer. On prototype #20, I changed that number to 2.5″ / 63.5mm while lengthening the axle to crown length due to jumping from 130mm to 140mm while shortening cockpit length a tad. Over time, as front center grew, I also started to feel like I was losing the ability to loft and pick up the front end of the bike. Naturally, the rear wheel and the line from its contact patch to your handlebar grips is a lever just as the distance from pedals to handlebar grips is a lever. The longer those are, the harder it becomes to pick up and loft the front end quickly. You have to exaggerate your movements and really get back and behind the rear wheel to pick it up. So by lengthening axle to crown due to an increase in fork length (I wanted to try a longer 140mm fork) I was able to reduce saddle to bar drop, but I also shortened my cockpit and reach, where by making those distances from rear wheel and pedal to handlebar shorter. I also slackened head tube angle from 67° to 66°. All of these subtle decisions ended up shortened reigned in front center a bit. Iit was still long which I have been finding beneficial. The slackening of head tube angle increased trail (an added benefit). The bike was easier to pick up and loft but relatively speaking, my front center was still long so I maintained that composure and stability but that increase in trail also heightened the feeling of stability and composure at speed. The bike felt snappy and quick in tight twisties, but smooth as can be in a straight-line as well as down hill.
However, as I increased front center, I had been keeping my chainstay length / rear center, relatively short. I had built a prototype that enabled me to run the chainstay as short as 16″ with the adjustment to lengthen it to 16.8″. At 16″, the bike was incredibly fast and easy to bunny hop but on longer rides, that short rear end beat the heck out of me (I had basically taken all of the resiliency out of the steel tubes). 16.75″ was a great all around performer for long days but 16.5″ was a sweet spot for a singlespeed 32×20 gear combo (Tension a 32×20, it’s almost right at 16.5″ – add two links lengthens it to 17″. We’ll get back to this in a minute). Well, as front center grew and rear center stay relatively short, I started noticing feedback from the trail grew more pronounced. Basically the front wheel would intersect with a trail obstacle, there would be a delay and then the rear wheel would intersect with that same object. All this time my wheelbase had been ballooning in length (recall it is currently 48.64″ / 1235.5mm). Increase your speed with a long wheelbase whose front center is long with a short rear center and I was finding this became jarring. When I had a relatively short front center, short rear center and a short wheelbase overall (Prototype #1’s wheelbase was 42.8″ / 1087.4mm – keeping in mind I’ve increased wheelbase overall by 5.84″ / 148.4MM!), hitting that same trail obstacle occurred in quick succession from front to rear which had a sensation of the bike basically “skipping” across that obstacle and terrain at speed. Basically with forward geometry, you relocate your body position forward of where it used to reside on a shorter front centered bike. You’re essentially “re-learning” your center point on the bike between the axle center lines. My rear center was too short. As front center grew, rear center must follow.
Prototype No. 18.
But how much? That’s debatable and nuanced for HOW you’re riding your bike. My hardtail duals as a singlespeed. Read it lives its life as a singlespeed 364 days a year with the exception of that one time I throw gears on it to go bikepacking. Remember that jump from 16.5″ to 17″? That is what drove this change in chainstay length: 2 links of chain. I knew rear center needed to grow and I knew that length needed to be governed by a singlespeed chain and a 32×20; my preferred gear combo. If 16.5″ is tensioned almost exactly with a 32×20 gear combo, adding two links grows chainstay length to 17″. I always built my hardtail singlespeeds to have a dropout slammed length of 16.45″. This allows for the sliders to be slammed in the slots and allow for the greatest amount of chain growth from stretch with a minimal growth of chainstay length as the chain stretches. So prototype #20 was built with a chainstay length of 16.9″ to allow the sliders to be as close to slammed when tensioned with a 32×20 combination and allow for minimal chainstay growth as the chain stretches. And wouldn’t you know that results in a chainstay length of approximately 430mm? Sounds familiar, doesn’t it? Not much growth, but just enough to calm down that abrupt feeling when the rear wheel slams into an obstacle at speed. Shortish but not too short. Or you could consider that longish while not being too long. The result? The bike was more composed and incredibly smooth as a result. But because of my small tweaks to front center, reach and cockpit lengths along with a slackening of head angle, I was able to increase trail, maintain snappiness and quick handling but quicken steering and increase the feeling of the bike being glued to the trail through turns due to lowering the bottom bracket without the bike feeling twitchy. This in-turn lowered my center of gravity: The lower your CG, the quicker the bike “feels” without feeling twitchy but the harder you can carve and lean your bike through a turn. You probably have discovered this acutely when you first rode a dropper. You could finally move the saddle out of the way and get REALLY low as in you lowered your center of gravity dramatically now that the saddle was out of the way. I increased this effect with the dropping of the bottom bracket height. If you haven’t already caught on; this is literally a game of degrees and millimeters you play to hone how a bike handles through the interconnectedness of all of these geometry choices.
Prototype No. 19.
And last but not least is seat tube angle. 73° has long been a good all around seat tube angle for good reason. Steep enough to tuck that rear wheel beneath you and get relatively quick snappy handling, you’re behind the bottom bracket giving you a relatively good setback, but not too far over the rear axle so the bike feels like it will tip backwards climbing. Now, as front center has grown, and reach numbers have grown, steepening the seat tube angle was inevitable to maintain relatively good handling when ascending. Again, too far back with a really slack front end and the rider is going to be dealing with a lot of front wheel flop because the rider is too darn spread out and too far over the rear axle. Your weight distribution is all wonky. To mitigate this, seat tube angle is steepened. Now on a hardtail, there is a tipping point of too steep of a seat tube angle. Where I’ve been landing as of late is a 76° effective seat tube angle (because my seat tube has a radius in it, I actually set this up in the jig using the seat tubes face to be set at 73° which gives me that effective seat tube angle of 76°). This gets me right in that hot spot of not too steep but not too slack. All the same principles of climbing on a 90’s mountain bike still apply: As terrain steepens, lower your elbows, slide your but forward and you maintain traction while not feeling like the bike will tip over from too much weight over the rear wheel. And because I’m able to keep my weight distributed correctly when climbing, I’m not having to fight the front wheel as much to keep it tracking without providing too much feedback (aka under or oversteering) as I’m climbing.
Prototype No. 20.
So there it is: 1991 to 2022. 31 years of riding and 10 years of design, build, ride, observe, repeat. There’s a really good piece of advice in that last sentence: Observation. Objective observation I might add. There’s been a few moments in those 31 years where I was reluctant to make a jump forward due to changes in technology or previous conceived notions of what I thought I knew. Honestly the more I’ve learn, the more I have come to understand that although I’m gaining knowledge I realize I still have a lot to learn. Geometry and handling is a life’s pursuit. Each bike is a destination but on the other hand it’s a new starting point. I’m at #20 and I can’t wait to see where this leads me. With patience and object observation, I know I’ll arrive at another destination that will be a new starting point.

Geometry
When I built my first bike, I pretty much didn’t have much of an understanding of geometry, handling and what made both click. I basically plucked a few numbers based on riding experience up to that point and then slowly, over many iterations, a lot of trial and error, riding, building and repeating, things started to coalesce into a cohesive understanding of geometry, handling and performance. That first bike was 10 years ago. It’s still a journey where bits and pieces take shape, break down or are thrown out the door only to be reassembled into a greater understanding. Consider that my journey, or your journey for that matter, will constantly be evolving, we’ll always be learning, and constantly honing our craft for a greater understanding that coalesces into what we know to be geometry. But before I delve into a deep download of what I’ve learned about geometry over the past 10 years, first a glossary of terms needs to be laid bare as simply as I can muster. So here goes from the front wheel to the rear wheel of a bicycle. I’ve included the common measurements in addition to a few that I use and advocate for to be added into the vernacular.
Geometry : Glossary of Terms
Head Tube Angle: The angle measured in degrees of the head tubes center line as it bisects a horizontal line defined as the axle centerlines.
Axle to Crown: Distance measured along the head tube centerline from crown race seat to front axle centerline. (Determine axle to crown and account for sag when designing a hardtail.)
Sag: Percentage of fork travel subtracted from axle to crown when fork is weighted by rider in a seated position.
Rake: This is the angle measured in degrees between the steering axis and a vertical line drawn from the front axle centerline. (In the past, this has been confused with offset in the bicycle world. Offset is offset. Rake is NOT offset.)
Offset: The distance measured perpendicularly from the steering axis to the centerline of the front wheel. (DO NOT REFER TO THIS AS RAKE)
Trail: The horizontal distance measured between where head tube centerline/steering axis and the perpendicular vertical distance of front axle centerline intersect with the ground. (More rake = more trail. Less rake = less trail. Simple, huh?)
Front Center: The distance from bottom bracket center to the front axle centerline (I’ve seen this measured as a pure horizontal distance and/or measured as the hypotenuse of the imaginary triangle formed by the bottom bracket and front axle with the axle centerline).
Reach: The horizontal distance from the center top of the head tube to the bottom bracket center.
Stack: The vertical distance from the bottom bracket to the top of head tube center.
Setback: The horizontal distance from bottom bracket center to seat tube centerline at the vertical and horizontal terminus of reach and stack. (I’d advocate for this to accompany reach and stack – and its a term I’ve used to explain this important missing measurement).
Cockpit: Center of the handlebar/stem connection measured horizontally to tip of saddle.
Nose: Horizontal distance from saddle tip to saddle rail / seat post clamp center.
Saddle Setback: Horizontal distance from seat post centerline to saddle rail / seat post clamp center.
Effective Top Tube Length: Horizontal distance measured between the top of the head tube’s centerline and seat tube centerline.
Actual Top Tube Length: Distance measured along top tube centerline where it intersects with seat tube centerline and head tube centerline.
Seat Tube Angle: Angle of seat tube centerline with horizontal centerline between front and rear axles
Saddle Height: Distance measured along seat tube centerline from bottom bracket center to horizontal top of saddle. (Often there is a valley from tip to tail on a saddle so be sure to lay something flat across the saddle to achieve this measurement more accurately).
Bottom Bracket Drop: The vertical distance from the axle center line perpendicular to the center of the bottom bracket.
Bottom Bracket Height: The vertical distance from the bottom bracket center perpendicular to the ground.
Chainstay Length (or rear center): Horizontal measurement from bottom bracket center to rear axle centerline. (When measuring this distance for a singlespeed, its paramount to measure this as the hypotenuse to optimize chain length and dial in tension so the sliders stay as slammed as possible to allow for chain growth.)
Wheelbase: Horizontal measurement from front axle to rear axle centerlines.
RAD / Rider Area Distance: The 2D distance projected and measured between the bottom bracket and grips.
Ok, now that we’re all on the same page, we can roll up our sleeves and set about the work of geometry, handling and performance of a bicycle. Road bikes that see a lot of mixed terrain, aka gravel bikes, share many of these attributes, and much of this knowledge can be applied to those same bikes. But for the sake of the conversation I’ll be solely focusing on geometry as it relates to a 29 inch mountain bike. And once again, to try and make this as simple and relatively straight forward to understand, I’m going to talk about the bike from front to rear and then discuss how the front and rear of the bike interact with one another and how each of the above terms defines and influences handling. There is one thing I can’t stress enough: No one single element above should be considered in isolation. They are very dynamic and have effects on one another that will influence how the entire bike handles. Small changes in design can have very large effects out on the trail. So you must have a handle on each of these pieces of the puzzle and how they interact with one another and again, to be repetitive: Do not look at them in isolation. So let us begin!
Broad Strokes
I always start a mountain bikes design with the riders fit which I see as the primary set of parameters. These are the 4 points in space that triangulate the rider: Cockpit, nose, saddle length and saddle height. The next set of parameters I address is riding style, intended use and terrain. These provide a clear path forward to begin addressing the physical geometry of the bicycle that will enhance the clients riding style, fit their intended use and address their chosen terrain so that the bike is an extension of the rider. Some times I will request photos of the clients existing bike from the side and/or photos of them seated in a “JRA” pedaling position if they cannot physically come to the shop. Small things I look for and confirm from their fit measurements are saddle to bar drop, position of saddle (too far forward or too far back) and stem length. All of these data points provide guardrails for the design process but also create a clear vision for the bikes purpose that drives the design. I begin by first laying out chainstay length, bottom bracket drop, seat tube centerline, seat tube angle, and saddle height. Bottom bracket, dropouts, chainstays and a preliminary seat tube length are laid into the drawing. Dimensions of saddles are dropped in with saddle centered on seat post rails. I now move across and establish cockpit length. Stem length, fork axle to crown (A2C) and offset have been pre-chosen based on the customers component spec and preference, so I’ll know what fork and stem are being spec’d and what the offset and A2C is in addition to stem length (and angle if applicable). I typically shoot for the bars and saddle to be just about dead even with no drop or around 1″ / 25.4mm of drop. Depending on the height and inseam of the rider, some times I will actually use A2C of the fork to raise or lower the front end of the bike a hair to get bar height optimized in relation to the saddle. I now drop down and establish head tube angle, lay in A2C accounting for sag and offset and lastly account for headset stack. Head tube length is now optimized and any additional stack between headset and stem is established. From here I now can optimize seat tube (ST) length based on the riders inseam and standover to establish top tube (TT) angle, location, and their connection (typically I leave 1.25″ / 31.8mm between the top of the ST to the top of the TT). The last two steps are optimizing seat stay angle and connection location to the seat tube, and down tube diameter, angle and location depending on rider weight and riding style. All throughout this process, the following points are being weighed throughout the design process and are primary drivers in my choice of geometry data points:
· Head tube angle, rake, trail, and offset all play a unique role in handling and they really riff off of one another. A change in one effects another down stream. Increase rake and you increase trail (or slacken head tube and you increase trail). Decrease rake and you decrease trail (or steepen head tube angle and you decrease trail). Trail is the ability for the front wheel to self-center itself. More trail equals more stability and composure at speed. An increase in offset lowers the front end of the bicycle. A decrease in offset raises the front end of the bicycle.
· Stem length and hand positioning relative to the steering axis add a layer of control or lack of control of the front end of the bicycle. The levers that the distance from rear tire contact patch to hand position and hand position to pedal contact have an effect on handling as well. These also effect the riders ability to pick up and loft the front end, how easy it is to compress the bike and load the front end as well as weight the front tire to gain traction into turns while pushing through the pedals either to bunny hop or carve through a turn. Basically these levers can be used to throw the bike around on the ground or in the air. Hands too far out in front of the steering axis require more rider input with weight distribution biased out in front of the bicycle, while hands close to or exactly at the steering axis requires less rider input. This is long stem, short front center vs short stem long front center. The tipping point being too long of a stem and your hands are too far forward of the steering axis combined with too steep of a head angle making control and handling more difficult (and sometimes a tad twitchy). The converse can also be true: Too slack and hands are too far behind the steering axis and odd things begin to occur with handling and control that are akin to having your hands too far out in front of the steering axis – that ones a bit tougher to explain I will add! So theres’s a sweet spot of stem length and hand positioning relative to the steering axis that optimizes how both the bike can be handled and how easy/hard the bike is to control at speed and/or through rough terrain.
· Bottom bracket height (BB height) is optimized by choosing bottom bracket drop (BB drop). Basically as low as possible without being a pedal striking nightmare. Sometimes I make compromises in BB drop to accommodate fit issues with height, inseam and saddle to bar drop. These are small choices. 2.375″ vs 2.25″ for example in drop in combination with a slight increase in fork trail or increase/decrease in offset. A small change in fit often results in a better performing bike because the bike now fits that much better and is that much more of an extension of the rider . However, these choices come with experience and nuance so there is a bit of knowing just how much to push these numbers will result in the balance you’re seeking. BB drop helps to establish the rider center of gravity (COG or CG). BB Height is another way of looking at this, but this also can be effected by tire pressure and tire size choice and often is dynamic if the bike is designed around a suspension fork (which is constantly moving up and down which means the head tube angle is steepening under braking or slackening under acceleration). BB drop choices also have an effect on how the bike will corner, carve and effects the “feel” of the bike over terrain and through turns.
· Chainstay length is a fun parameter. Really short and the bike is a bunny hopping and manualing machine but to the detriment of ride quality. You essentially design out any resiliency in the material and trade that for stiffness. Too long and the bike begins to be too sluggish and a chore to pick up and over obstacles in a bunny hop or manual. As a designer, I’m constantly looking to optimize this parameter for its intended use and terrain. Often my mountain bikes are singlespeed’s, so a lot of chainstay length can primarily be driven by optimizing chainstay length both slammed if in geared mode or tensioned in singlespeed mode. However, I’ve come to know over time, and I’ll expand on this in a bit, that as front center has grown, rear center must follow. The trick to this puzzle is by how much chainstay length needs to grow so you optimize for use and terrain but you maintain handling characteristics that enhance its use while optimizing performance for its intended terrain. The balance of all day comfort with ample power transfer and lateral stiffness that delivers consistent traction is the riddle chainstay length helps to unlock.
· Front center and wheelbase play a large role in ride quality. Balancing front and rear center distribution is key. I primarily see these numbers play out as a result of all the other decisions I’ve made with the design of the bike up to this point. If front center seems a tad too long for a given riders physicality at this point, I’ll make adjustments in reach and stem length or further optimize cockpit length to tame this number. Another parameter I’m looking at is head tube angle. In rare cases I may slacken or steepen this number to either lengthen or shorten front center and wheelbase but its a rare occasion that this occurs (and I’m also balancing the factors I just mentioned in addition to this one). This has a direct effect on wheelbase and 9 times out of 10, basically at this point the bike I’ve designed based on all of the previous decisions is a bike that finally fits and is proportionate to the rider. Again, every geometry point has an effect on the sum total and a well fitting bike is a bike that performs for the rider. So sometimes fit will trump geometry.
· The last piece of the puzzle is RAD or “rider area distance”. This is the distance measured between the bottom bracket center and the grips. What I’m currently focusing on and will continue to put more time into is the influence RAD has on handling and your ability to move the bike and/or move with the bike. Optimizing this number with all of the above is my next stepping stone. An interesting data point I just discovered too. I measured RAD across all 3 of my current mountain bikes (the Single Speed and both FS prototypes) and its identical: 33.5″ / 850.9mm.
Into the weeds but hopefully not into the cabbage…
A little background behind 4 formative hardtail’s that set me on a collision course with building my own frame. My first mountain bike was a 1991 Trek 830 Antelope. Florescent yellow with black paint splatter. Searching through old catalogs and databases, my first mountain bike sported a 69.5° head tube angle, 72.5° seat tube angle, 429mm chainstay length, offset was 46 with a wheelbase of 1054mm. I replaced the Trek 830 with a 1996 Specialized Stumpjumper M2 that a shop parted out since it was a left over from a previous season. I test rode a 17″ M2 in red, but it was just a tad too small so I ended up with a 19″ in this deep matte blue kinda plum color. Again, searching through online databases, head angle was 71°, seat tube was 73°, offset was 42mm, wheelbase was 1052.7mm, 430mm rear center and they actually gave a front center measurement of 625.9mm. My next bike was a 1998 Voodoo Bizango. I loved this bike. Reynolds 853. A dreamy schwinn stingray-like green they called “serpent green”. I can’t locate the Bizango’s geo, but I seem to recall maybe it was in the 70/71° HT angle range, with 73° seat tube? But just after I ripped the head tube off of this in Emmaus on Christmas break (a fateful afternoon – I was heartbroken and crestfallen), I rebuilt my Stumpjumper and began the search for a new steel frame. I remember calling a shop that was a Voodoo dealer immediately and got the word that they had JUST filed for bankruptcy. How about that for bad luck?
Once back at school, I would check craigslist daily for months. And low and behold my holy grail of frames popped up one afternoon. I ran back to my apartment and immediately called the seller of a 17″ 1994 Eastern Woods Research (EWR) Original Woods frame in gloss black with yellow vinyl decals. Serial Number R-HE-119-7-94. (Jay DeJesus later decoded this for me: 1=nothing, 1=1st prod. run, 9=9th in batch, 7=July, 94=1994). A week later, I had my holy grail of bicycle frames. (I think I paid 150-200 simoleons for that frame!) Head angle of 72°, seat tube was 73.5°, 15.9″ chainstay length, bottom bracket height of 12.5″ and a top tube length of 22.375″. It had seen a lot of hard use, but I built that bike up and man did it sing out on the trail. As the 1993 catalogue states: “The ride is as unique as the look – short rear, long front, high B.B., and aggressive angles make it quick, nimble in singletrack, easy to jump, a BLAST to ride.” Sweeter words never dripped from the page. The Original Woods was WAY ahead of its time.
Looking over the above numbers, things started sorta slack (69.5° in 1991? NORBA standard geo was 71/73!), then slowly started to creep ever more steep until I connected the dots to the EWR, which actually was quite steep. Now I’m not saying this geo was better or worse than current forward geometry is now, but the progression of all these numbers started to formulate an experience out on the trail I sought, and the description of the Original Woods Frame has always stuck with me. The feeling I got when I rode that bike has never left me either. That was my benchmark: If I could recreate that same feeling I had on the EWR with my own bikes, then I was on to something. And it would take me a full 10 years of “Build, Ride, Repeat” to arrive at that location. I wanted an all around mountain bike that could climb, descend with the best of them but jib off of all points in between. According to my opinion: the spaces between the ascents and descents are where the magic is hidden. This is where you want that big BMX bike in the woods to show up so you can bunny hop off of rocks, stumps, roots and other small trail features. But to get there, I had to sort everything out through trial and error. And just for comparison sake, my current bike matched up to that EWR is as such: 66° head tube angle, 2.5″ of bottom bracket drop, 16.9″ / 429.3mm chainstay length, 31.64″ / 803.7mm front center, and a 48.54″ / 1232.9mm wheelbase. And just to note, that is a whopping 5.84″ difference in wheelbase between the first prototype to the last one I’m currently riding. (Add close to 2″ of wheel base for the Snakedriver…). Out of the 20 prototypes I’ve built for myself, these three were pivotal (Readers Note: The numbers in the parenthesis are headtube angle/seat tube angle).
The first mountain bike I built with the help of master framebuilder Ted Wojcik (69/73 – this frame is on the wall in the shop – I may have to build this up just for kicks at some point!):
Prototype #11 (70/73):
And finally this bike, prototype #17, was the one that got me really thinking (67/75):
The above bike was so eye opening, I immediately built an identical version in Titanium. What had happened slowly over time was I was growing front center and slackening head tube angle. The more I slackened head angle, the more front center grew and the more those two changed, I started noticing just how much faster I could go and simultaneously how much more control I had in addition to how much stability the bike possessed. Basically I was increasing rake. And as you increase rake, you increase trail.
Or to look at it another way: slackening head tube increases trail while steepening head tube angle decreases trail. Trail directly effects handling in a specific way: The longer the trail, the more the front wheel wants to seek a straight line and self-center. The shorter the trail, the more twitchy the front end begins to be and the quicker the effects of steering become. Conversely, the longer the trail number, the more you can begin to lean the bike vs steering the bike.
While I was playing with these numbers and angles, I was also fiddling with my fit. Saddle height has always hovered in the 30.5-31″ / 774-787mm range while my cockpit length was the one that was drastically shifting from long to short over time. That number was in flux for a while stretching all the way out to 22″ / 559mm and then gradually bringing it back to its current 20.5″ / 521mm dimension. The other factor I was playing with that can dramatically effect front center: Stem Length. If you keep your cockpit (basically your fit) the same across multiple bikes, but reduce the stem length, the front wheel must move forward while the top tube length increases to make up for the amount of stem length you’ve removed to keep that cockpit length the same. If you’re dealing with a reach number, you technically have to increase reach to make up for that loss of stem length if the handlebars stay in the same place. So keeping an eye on my cockpit length and triangulating my contact points in space fit wise with a slacker head angle combined with a shorter stem resulted in an increase of trail and an increase of front center. This resulted in the bike being incredibly stable at speed, composed through rough sections, but if you made a mistake either on flat trail, down hill or up, less rider input was required for self-correction of the front wheel. Remember that longer trail number wants to self-center itself. Those 3 factors aided in composure and confidence at higher speeds with the ability to really lean and carve the bike through turns however without the detriment to technical handling in techy singletrack.
Along with this slackening of the head angle, increasing trail and lengthening front center, I was shortening my stem. One factor I started taking notice to on the drawing board was the relationship of where the stems vertical centerline bisected with the steering axis in relation to the bottom of the head tube and where my hands were in relationship to the steering axis. The longer the stem, the further out in front of the steering axis my hands were and the further in front of the steering axis the stem center point intersected with the steering axis as well. This was incredibly apparent with those 4 early bikes (each sported something like a 90-130mm stem). But back to the drawing board, when I kept my cockpit length and fit the same, but designed around a shorter stem and much slacker head angle, that same vertical intersection of stem clamp center and steering axis with relation to the head tube bottom? The intersection point was behind the head tube bottom and the closer my hands were to the steering axis. This resulted out on the trail to greater control and more responsiveness with relation to head angle, front center and trail. I no longer had to “steer” the bike. I was leaning the bike to turn and using my tires a heck of a lot more because I could now confidently lean without feeling a sense that the front wheel was going to snap out from under me. Again an increase in trail, an increase in front center, a slackening of head tube angle and a shortening of stem length while keeping cockpit relatively the same lended more control and composure at speed.
All this time through 19 prototypes I had left bottom bracket drop at 2.25″ / 57.15mm. Very early on I fiddled with this number and found a sweet spot of just enough drop so bottom bracket height wasn’t too low resulting in few pedal strikes but not too high where I felt pitched up and forward with too much weight on the front wheel. I was centered and “IN” the bike. However, all along I knew from Ted Wojcik that you can quicken steering by lowering bottom bracket height (which lowers your center of gravity a touch and hence allow the bike to corner quicker). So how much can I push this before it becomes a pedal basher was the question to answer. On prototype #20, I changed that number to 2.5″ / 63.5mm while lengthening the axle to crown length due to jumping from 130mm to 140mm while shortening cockpit length a tad. Over time, as front center grew, I also started to feel like I was losing the ability to loft and pick up the front end of the bike. Naturally, the rear wheel and the line from its contact patch to your handlebar grips is a lever just as the distance from pedals to handlebar grips is a lever. The longer those are, the harder it becomes to pick up and loft the front end quickly. You have to exaggerate your movements and really get back and behind the rear wheel to pick it up. So by lengthening axle to crown due to an increase in fork length (I wanted to try a longer 140mm fork) I was able to reduce saddle to bar drop, but I also shortened my cockpit and reach, where by making those distances from rear wheel and pedal to handlebar shorter. I also slackened head tube angle from 67° to 66°. All of these subtle decisions ended up shortened reigned in front center a bit. Iit was still long which I have been finding beneficial. The slackening of head tube angle increased trail (an added benefit). The bike was easier to pick up and loft but relatively speaking, my front center was still long so I maintained that composure and stability but that increase in trail also heightened the feeling of stability and composure at speed. The bike felt snappy and quick in tight twisties, but smooth as can be in a straight-line as well as down hill.
However, as I increased front center, I had been keeping my chainstay length / rear center, relatively short. I had built a prototype that enabled me to run the chainstay as short as 16″ with the adjustment to lengthen it to 16.8″. At 16″, the bike was incredibly fast and easy to bunny hop but on longer rides, that short rear end beat the heck out of me (I had basically taken all of the resiliency out of the steel tubes). 16.75″ was a great all around performer for long days but 16.5″ was a sweet spot for a singlespeed 32×20 gear combo (Tension a 32×20, it’s almost right at 16.5″ – add two links lengthens it to 17″. We’ll get back to this in a minute). Well, as front center grew and rear center stay relatively short, I started noticing feedback from the trail grew more pronounced. Basically the front wheel would intersect with a trail obstacle, there would be a delay and then the rear wheel would intersect with that same object. All this time my wheelbase had been ballooning in length (recall it is currently 48.64″ / 1235.5mm). Increase your speed with a long wheelbase whose front center is long with a short rear center and I was finding this became jarring. When I had a relatively short front center, short rear center and a short wheelbase overall (Prototype #1’s wheelbase was 42.8″ / 1087.4mm – keeping in mind I’ve increased wheelbase overall by 5.84″ / 148.4MM!), hitting that same trail obstacle occurred in quick succession from front to rear which had a sensation of the bike basically “skipping” across that obstacle and terrain at speed. Basically with forward geometry, you relocate your body position forward of where it used to reside on a shorter front centered bike. You’re essentially “re-learning” your center point on the bike between the axle center lines. My rear center was too short. As front center grew, rear center must follow.
Prototype No. 18.
But how much? That’s debatable and nuanced for HOW you’re riding your bike. My hardtail duals as a singlespeed. Read it lives its life as a singlespeed 364 days a year with the exception of that one time I throw gears on it to go bikepacking. Remember that jump from 16.5″ to 17″? That is what drove this change in chainstay length: 2 links of chain. I knew rear center needed to grow and I knew that length needed to be governed by a singlespeed chain and a 32×20; my preferred gear combo. If 16.5″ is tensioned almost exactly with a 32×20 gear combo, adding two links grows chainstay length to 17″. I always built my hardtail singlespeeds to have a dropout slammed length of 16.45″. This allows for the sliders to be slammed in the slots and allow for the greatest amount of chain growth from stretch with a minimal growth of chainstay length as the chain stretches. So prototype #20 was built with a chainstay length of 16.9″ to allow the sliders to be as close to slammed when tensioned with a 32×20 combination and allow for minimal chainstay growth as the chain stretches. And wouldn’t you know that results in a chainstay length of approximately 430mm? Sounds familiar, doesn’t it? Not much growth, but just enough to calm down that abrupt feeling when the rear wheel slams into an obstacle at speed. Shortish but not too short. Or you could consider that longish while not being too long. The result? The bike was more composed and incredibly smooth as a result. But because of my small tweaks to front center, reach and cockpit lengths along with a slackening of head angle, I was able to increase trail, maintain snappiness and quick handling but quicken steering and increase the feeling of the bike being glued to the trail through turns due to lowering the bottom bracket without the bike feeling twitchy. This in-turn lowered my center of gravity: The lower your CG, the quicker the bike “feels” without feeling twitchy but the harder you can carve and lean your bike through a turn. You probably have discovered this acutely when you first rode a dropper. You could finally move the saddle out of the way and get REALLY low as in you lowered your center of gravity dramatically now that the saddle was out of the way. I increased this effect with the dropping of the bottom bracket height. If you haven’t already caught on; this is literally a game of degrees and millimeters you play to hone how a bike handles through the interconnectedness of all of these geometry choices.
Prototype No. 19.
And last but not least is seat tube angle. 73° has long been a good all around seat tube angle for good reason. Steep enough to tuck that rear wheel beneath you and get relatively quick snappy handling, you’re behind the bottom bracket giving you a relatively good setback, but not too far over the rear axle so the bike feels like it will tip backwards climbing. Now, as front center has grown, and reach numbers have grown, steepening the seat tube angle was inevitable to maintain relatively good handling when ascending. Again, too far back with a really slack front end and the rider is going to be dealing with a lot of front wheel flop because the rider is too darn spread out and too far over the rear axle. Your weight distribution is all wonky. To mitigate this, seat tube angle is steepened. Now on a hardtail, there is a tipping point of too steep of a seat tube angle. Where I’ve been landing as of late is a 76° effective seat tube angle (because my seat tube has a radius in it, I actually set this up in the jig using the seat tubes face to be set at 73° which gives me that effective seat tube angle of 76°). This gets me right in that hot spot of not too steep but not too slack. All the same principles of climbing on a 90’s mountain bike still apply: As terrain steepens, lower your elbows, slide your but forward and you maintain traction while not feeling like the bike will tip over from too much weight over the rear wheel. And because I’m able to keep my weight distributed correctly when climbing, I’m not having to fight the front wheel as much to keep it tracking without providing too much feedback (aka under or oversteering) as I’m climbing.
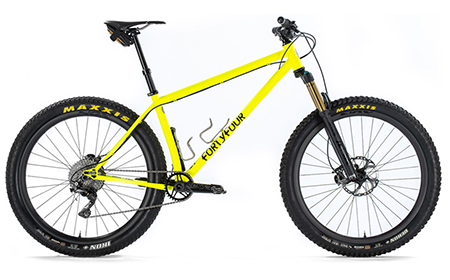
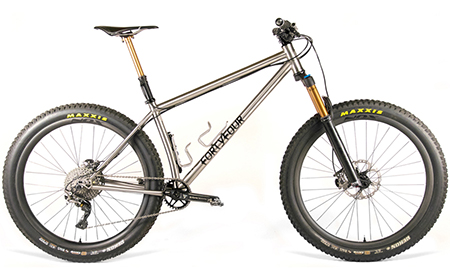
Prototype No. 20.
So there it is: 1991 to 2022. 31 years of riding and 10 years of design, build, ride, observe, repeat. There’s a really good piece of advice in that last sentence: Observation. Objective observation I might add. There’s been a few moments in those 31 years where I was reluctant to make a jump forward due to changes in technology or previous conceived notions of what I thought I knew. Honestly the more I’ve learn, the more I have come to understand that although I’m gaining knowledge I realize I still have a lot to learn. Geometry and handling is a life’s pursuit. Each bike is a destination but on the other hand it’s a new starting point. I’m at #20 and I can’t wait to see where this leads me. With patience and object observation, I know I’ll arrive at another destination that will be a new starting point.