If there’s one thing I’ve built a lot of, it’s bikes for myself. Over 20 and counting… And that’s just hardtail mountain bikes. I’ve been in hot pursuit of “stripped down simplicity” for as long as I can remember. Even before I started building, I was thinking about what I could take away from the ride to make it better. “Do I need this?” is a question I’d often ask myself (and I still ask myself). Maybe it was necessity. Perhaps it was sheer curiosity to understand how it all works. It is most likely both those factors and then some. But the more I build, the more I’ve come to realize, no.. know: I’ve come to KNOW less is more. (Even that sentence was rewritten 3 times to remove that which can be filed under “verbose”.) What really do we need and compare that with what do we really want? What I want is a bike that’s fun. What I need is a bike that’s dead simple. I’m most likely still not completely finished and in many ways, the Marauder will continue to evolve. What continues to change moves through an ever narrower lens. Progression past the obvious is and always will be a difficult pursuit yet one I invite through the front door. The simple solution often is the most difficult destination to call home. It’s in this spirit that the Marauder was born.
3 years ago, I realized something was missing. I reflected on my past and realized it was fishing. Bikes have been a constant throughout my life but this passion was combined with fishing from a young age. Ride to the Perkiomen. Fish. Ride back into town, ditch the fishing gear and rip around the neighborhood. Or reverse that order. Now that my “career” had started to fall into a routine of sorts, I naturally had more time to reflect and that reflection exposed that gaping hole. I had always wanted to learn how to fly fish, so that spring, I began the long journey of teaching myself how to fly fish. Instantly I was overwhelmed by the sheer volume of information you needed to know. Leader length. Rod weight. Reading water. Rise forms. Pockets, pools, runs, seams. Cushion. Nymphs. Dry flies. Streamers. What are the fish telling me? I approached the water tepidly and instantly knew I had no clue what I was doing. I wasn’t treading water, I was literally afloat down stream without a rudder. But one thing stuck out: My cast and presentation of the flies. I cut through the fog of knowledge I was lacking and recognized if I broke this all down into simple component parts, and started with my cast, that could carry me through that first season. A lot of days were spent out on the water casting, not fishing. They do calling it fishing, not catching after all. But slowly the mechanics of it all started to fall into place. I began to understand the feel of the rod loading and unloading. The timing started to become routine. The muscle memory began to take shape. And I started to catch fish.
This process is very akin to how I went about developing the Marauder. Approach problem. Become overwhelmed. Break down the problem into component parts. Build. Ride. Gain knowledge and become informed. Revise. Build. Ride. Gain more knowledge and build on what I’ve discovered while challenging my assumptions. This drumbeat of “build, ride, repeat” became a routine of its own. The routine of it all started to narrow my focus while broadening what I was able to assess. Those experiences out on the trail informed my decisions at the drawing board. As parameters began to come into focus, I was able to isolate specific problems and design solutions all while stepping back and seeing the proverbial forest for the trees as geometry relates to handling and how fit plays a role within those two bookends. Case in point, the geometry of a bike can be very well honed but if that same bike doesn’t fit the rider, the bike won’t handle well for that rider and their experience will be lacking. And that’s really what I’m looking for: What is the riders experience? That will be a result of all the R&D on the front end and if I’ve done my homework, that experience will be fun.
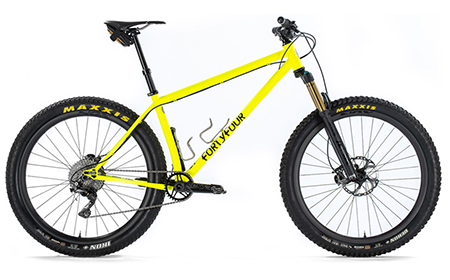
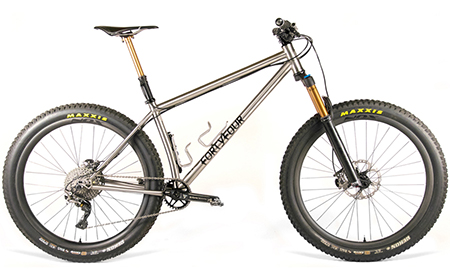
By the numbers, the Marauder in its current form is honestly pretty straight forward (Pictured above is what a size Large Stock Marauder is based on, and the below should be referenced as such):
66° HT angle
75° ST Angle (Effective)
477mm Reach
634mm Stack
156.5mm Layback (Add this to reach to get effective TT length)
63.5mm BB drop / 305mm BB Height
431.8mm CS Length (slammed – with 32×20 gear combo its ~438mm)
781mm Front Center
140mm Fork
1206mm Wheelbase (Again, that’s the stock large)
29″ wheels w/ room for 2.4″-2.6″ tires
Internal Dropper w/externally routed cables throughout
T47 Bottom Bracket
Paragon Machine Works Hooded Slider Dropouts
Two points that may stand out are front and rear centers. As front center has grown over time, I’ve noticed that rear center has to grow as well. I noticed this out on the trail with trail hits or “trail nasties” as EWR’s Jay DeJesus called them. In the northeast these are rocks and roots. Basically anything that’s not smooth in front of you that’s going to slow you down or force your line choice elsewhere. Riding through these with a long front center and a short rear center resulted in a rather harsh ride. The hit from front to rear becomes abrupt as front center grows and rear center remains short. Lengthening rear center has a multi-pronged affect: This smooths out trail feedback but it also lengthens wheelbase which improves stability at speed. All the other mixture of geometry choices keeps the bike nimble and reactive through tight, techy and twisty terrain. But at speed, this bike hauls, is composed and because of those numbers, you can lean into and through turns with a lot of confidence.
One point of contention regardless of material but is exasperated in titanium is the drive side chainstay when it comes to tire and chainring clearance. As tires and rim technology has evolved (read bigger tires and wider rim internal widths), that’s squeezed the available real estate between those two. Lengthening the chainstay helps to mitigate this some while modern 1×12 drivetrains have bumped chainline out by a few millimeters, also creating a bit more breathing room. But to really make it all work and play well together, physical material needs to be removed or manipulated in some fashion. Enter 3D printing. This has really allowed me as both a designer and builder to achieve both want and need: Improve chainring clearance while increasing tire clearance and optimizing strength and stiffness at a critical load and failure point of the bicycle. This comes in the form of a 3D printed chainstay yoke, printed right here in the USA by Silca to my design and specifications.
The beauty of 3D printing in metal is two fold: As a designer, I not only have access to the exterior of the part but I also now have full control over the inside of the part. CNC is a subtractive manufacturing process and like any tool or application, has its place in a designers tool kit. 3D printing is an additive manufacturing process, so the design approach and methodology are quite different. The second facet is its ability to be designed to be a seamless integration with round tubes. Aesthetically, some processes can have a clunky outcome. Water jet and laser cut part assemblies are clever but can often fall into the abrupt aesthetic spectrum of “round peg in a square hole”. 3D printing allows me to work more seamlessly with how parts transition from round tubes to parts and back to round tubes. Every element of a metal bike is based on a circle right down to a water bottle boss. With the introduction of 3D printing into my design tool kit, form and function are now truly one.
Originally all the cable routing came down the underside of the top tube, then split off to the seatstays to go to the rear brake and rear derailleur. Enter droppers that were externally routed. My cable routing could remain neat and tidy along the underside of the top tube but as droppers evolved, internal routing became the standard. This posed a design challenge after building around them for several seasons. Routing remained under the top tube but the internal dropper was routed up the down tube at about 10-11 o’clock just offset from the down tubes water bottle boss. At this point I had been building for over a decade and had enough data to realize that as the bikes were ridden, dust, mud and/or water would collect on the underside of the top tube and slowly wear through powder and finishes (and metal) causing the finish to begin to blister and rust / corrosion to form.
This posed a problem that needed to be addressed. As a designer, you’re taught to observe and collect information to inform your design process. This design process is in many ways identical to the scientific method: Observation, measurement, and experimentation rather than relying on assumptions. What I observed is that due to the nature of a round tube, dust, dirt and muck all accelerated by water collects on the undersides of tubes. Its a cascading effect of sorts. This gets trapped between cables/housing and then abrades the tube and finish under the top tube as the rider either picks up or shoulders the bike or from vibration transmitted through the frame while riding. So it was only natural from a functional standpoint to experiment with locating the cables on the top of the down tube rather than the bottom of the top tube or down tube where muck would wear finishes and collect. By relocating the cables to the top or biased to the side of the down tube (which is round) dust, muck or any combination would naturally want to cascade and roll towards the bottom of the tube. Sort of a self cleaning attribute. Functionally, it would make sense to continue this trend on top of the chainstays but you run into functional restraints on the driveside due to the drivetrain. You could certainly run them through the chainstays but this adds two failure points on a high stress location and for sake of ease of maintenance, symmetry, and aesthetics (aka form) I landed on routing them on the underside of the chainstays where they are functionally optimized for all the above reasons. Some may call this a best practice due to their use case. I simply call this solution “elegant”.
A long time client from Switzerland lives close to the French Alps. His rides, on his singlespeed, routinely saw average elevation gain of 10k. That’s PER ride. (Also of note? His gearing at the time was 34×18…). Every other season it seemed he was emailing me to let me know once again, he’d sheered off another driveside bottom bracket cup. Not as a complaint, but more of a “well, I did it again!” Again, observation, measurement and experimentation creates the necessity for going back to the drawing board. Enter T47. What T47 has that BB30 and its ilk don’t have is simple: THREADS. So you can throw those creaks out the door. T47 also allows you to run a slightly larger bearing appropriately sized for modern mountain bike crank spindles (24mm, 29mm and 30mm) while placing the bearing partially or entirely inside the bottom bracket shell. The bearing and/or cup are parts meant to wear. There’s an argument to be made that this all is eliminated if you increase the precision of the BB bearing race interfaces but this adds expense to the entire scenario. The old adage of “Light, strong and cheap: Pick two” comes to mind. A T47 allows the interface to be precise enough so you keep costs relative while increasing strength and durability. If you’re weight conscious, there’s options out there but most T47 bottom brackets aren’t significant boat anchors (and of all the places where you could place more weight, the bottom bracket is a good spot). A really cool version of the T47 is BB86. This standard is identical in width to a standard 73mm bb shell with external cups BUT BB86 puts the bearings entirely inside the bottom bracket shell, which fully supports the bearing. Here’s a pic below to show those two standards side by side. See how they are identical in width?
For all the reasons above, I’ve moved exclusively to T47 bottom brackets in all my hardtail mountain bikes (unless the client asks otherwise). This moves the bearing inside or partially inside the BB shell while adding more material to a critical location of stress. There really isn’t much of a shoulder or step from cup to thread as compared to BSA bottom brackets and modern requirements for bottom brackets and crank spindles. The above bike is a prototype which the size large stock Marauder is based and uses a 73mm T47. Subsequent client builds have used BB86 T47 shells and there’s a good argument to be made that I might move entirely to BB86 once my stock of 73mm shells reaches zero. But for now, T47 in those two standard configurations rule the day.
Last but not least are the dropouts on the Marauder. Enter the venerable Paragon Machine Works hooded slider. Most likely the most versatile dropout ever designed. (Credit Eric Barr from Ground Up for its conception and Mark Norstad from Paragon for its formalization.) Every bike I’ve ever built using this dropout is forward and backward compatible with every standard the bicycle world seems to cook up: Both Sram/Shimano hanger configurations, Rohloff, Post Mount, ISO, Flat Mount, UDH and of course… Singlespeed. And its for this reason I’ve been using them (there *might be something I’m cooking up here at 44HQ but that will remain and be filed under TOP SECRET).
But its for their versatility I chose them as the dropout for this platform. You pretty much get two bikes in one: Gears for when the going gets tough and you need some range or keep it simple and run it as a singlespeed. And any configuration in-between be it something Shimano or Sram cooks up, Paragon had you covered. I say that in past tense as sadly, Paragon is no more but from their ashes, Firsthand has risen to the occasion and purchased all of Paragon’s IP including their tooling. So most builds from here on out till I run out you’ll see the hashtag or reference to “NOS Paragon”. Never thought I’d be referring to Paragon parts as NOS, but its 2026 and the current timeline demands it, which is a whole other conversation we won’t be covering in todays class. (Perhaps next semester.) But I digress. These dropouts have it all from compatibility to ease of setup, lateral stiffness due to the hooded configuration and loads of adjustment to vary chainstay length if you like to fiddle.
A frequently overlooked detail is the shaping on my chainstays in both steel and titanium. This isn’t all aesthetics (thats more a result of its function) but rather than upping the tube diameter from 22mm to 25mm in Ti or (19 to 22 mm in steel) what I do is ovalize the center section of a 22mm Ti / 19mm Steel tube so it has the lateral stiffness of the next size OD tube. So 19mm steel tube is ovalized to 22mm and a 22mm Ti tube is ovalized to 25mm. I get the lateral stiffness of a larger diameter tube while retaining the relative weight of a smaller tube. All shaped in house to increase tire and heal clearance while optimizing weight and lateral stiffness in a tight package. Combine this with the yoke design for the driveside and I’ve checked all my boxes.
One last driving force behind the Marauder I’m going to coin here is what I refer to as “Progressive Simplicity”. In a nutshell, this is my ethos of constant evolution and pushing boundaries in form and function to achieve the most simple, straight forward solution. Every detail is considered. Every decision is functionally driven with an eye to aesthetic balance. Everything has a reason for being. There is no room for excess in this methodology. If its frivolous, its excluded. If it serves no purpose, its eliminated. To the uninitiated, these are not toys nor are they tools. They are by nature pure utility. They are purposefully designed to be an extension between rider and terrain. The driving design parameter is to bring to bear only that which is necessary for the task. This idea of “stripped down simplicity” is pervasive in all of my work and the Marauder embodies this concept wholeheartedly from axle to axle.


Progressive Simplicity
If there’s one thing I’ve built a lot of, it’s bikes for myself. Over 20 and counting… And that’s just hardtail mountain bikes. I’ve been in hot pursuit of “stripped down simplicity” for as long as I can remember. Even before I started building, I was thinking about what I could take away from the ride to make it better. “Do I need this?” is a question I’d often ask myself (and I still ask myself). Maybe it was necessity. Perhaps it was sheer curiosity to understand how it all works. It is most likely both those factors and then some. But the more I build, the more I’ve come to realize, no.. know: I’ve come to KNOW less is more. (Even that sentence was rewritten 3 times to remove that which can be filed under “verbose”.) What really do we need and compare that with what do we really want? What I want is a bike that’s fun. What I need is a bike that’s dead simple. I’m most likely still not completely finished and in many ways, the Marauder will continue to evolve. What continues to change moves through an ever narrower lens. Progression past the obvious is and always will be a difficult pursuit yet one I invite through the front door. The simple solution often is the most difficult destination to call home. It’s in this spirit that the Marauder was born.
3 years ago, I realized something was missing. I reflected on my past and realized it was fishing. Bikes have been a constant throughout my life but this passion was combined with fishing from a young age. Ride to the Perkiomen. Fish. Ride back into town, ditch the fishing gear and rip around the neighborhood. Or reverse that order. Now that my “career” had started to fall into a routine of sorts, I naturally had more time to reflect and that reflection exposed that gaping hole. I had always wanted to learn how to fly fish, so that spring, I began the long journey of teaching myself how to fly fish. Instantly I was overwhelmed by the sheer volume of information you needed to know. Leader length. Rod weight. Reading water. Rise forms. Pockets, pools, runs, seams. Cushion. Nymphs. Dry flies. Streamers. What are the fish telling me? I approached the water tepidly and instantly knew I had no clue what I was doing. I wasn’t treading water, I was literally afloat down stream without a rudder. But one thing stuck out: My cast and presentation of the flies. I cut through the fog of knowledge I was lacking and recognized if I broke this all down into simple component parts, and started with my cast, that could carry me through that first season. A lot of days were spent out on the water casting, not fishing. They do calling it fishing, not catching after all. But slowly the mechanics of it all started to fall into place. I began to understand the feel of the rod loading and unloading. The timing started to become routine. The muscle memory began to take shape. And I started to catch fish.
This process is very akin to how I went about developing the Marauder. Approach problem. Become overwhelmed. Break down the problem into component parts. Build. Ride. Gain knowledge and become informed. Revise. Build. Ride. Gain more knowledge and build on what I’ve discovered while challenging my assumptions. This drumbeat of “build, ride, repeat” became a routine of its own. The routine of it all started to narrow my focus while broadening what I was able to assess. Those experiences out on the trail informed my decisions at the drawing board. As parameters began to come into focus, I was able to isolate specific problems and design solutions all while stepping back and seeing the proverbial forest for the trees as geometry relates to handling and how fit plays a role within those two bookends. Case in point, the geometry of a bike can be very well honed but if that same bike doesn’t fit the rider, the bike won’t handle well for that rider and their experience will be lacking. And that’s really what I’m looking for: What is the riders experience? That will be a result of all the R&D on the front end and if I’ve done my homework, that experience will be fun.
By the numbers, the Marauder in its current form is honestly pretty straight forward (Pictured above is what a size Large Stock Marauder is based on, and the below should be referenced as such):
66° HT angle
75° ST Angle (Effective)
477mm Reach
634mm Stack
156.5mm Layback (Add this to reach to get effective TT length)
63.5mm BB drop / 305mm BB Height
431.8mm CS Length (slammed – with 32×20 gear combo its ~438mm)
781mm Front Center
140mm Fork
1206mm Wheelbase (Again, that’s the stock large)
29″ wheels w/ room for 2.4″-2.6″ tires
Internal Dropper w/externally routed cables throughout
T47 Bottom Bracket
Paragon Machine Works Hooded Slider Dropouts
Two points that may stand out are front and rear centers. As front center has grown over time, I’ve noticed that rear center has to grow as well. I noticed this out on the trail with trail hits or “trail nasties” as EWR’s Jay DeJesus called them. In the northeast these are rocks and roots. Basically anything that’s not smooth in front of you that’s going to slow you down or force your line choice elsewhere. Riding through these with a long front center and a short rear center resulted in a rather harsh ride. The hit from front to rear becomes abrupt as front center grows and rear center remains short. Lengthening rear center has a multi-pronged affect: This smooths out trail feedback but it also lengthens wheelbase which improves stability at speed. All the other mixture of geometry choices keeps the bike nimble and reactive through tight, techy and twisty terrain. But at speed, this bike hauls, is composed and because of those numbers, you can lean into and through turns with a lot of confidence.
One point of contention regardless of material but is exasperated in titanium is the drive side chainstay when it comes to tire and chainring clearance. As tires and rim technology has evolved (read bigger tires and wider rim internal widths), that’s squeezed the available real estate between those two. Lengthening the chainstay helps to mitigate this some while modern 1×12 drivetrains have bumped chainline out by a few millimeters, also creating a bit more breathing room. But to really make it all work and play well together, physical material needs to be removed or manipulated in some fashion. Enter 3D printing. This has really allowed me as both a designer and builder to achieve both want and need: Improve chainring clearance while increasing tire clearance and optimizing strength and stiffness at a critical load and failure point of the bicycle. This comes in the form of a 3D printed chainstay yoke, printed right here in the USA by Silca to my design and specifications.
The beauty of 3D printing in metal is two fold: As a designer, I not only have access to the exterior of the part but I also now have full control over the inside of the part. CNC is a subtractive manufacturing process and like any tool or application, has its place in a designers tool kit. 3D printing is an additive manufacturing process, so the design approach and methodology are quite different. The second facet is its ability to be designed to be a seamless integration with round tubes. Aesthetically, some processes can have a clunky outcome. Water jet and laser cut part assemblies are clever but can often fall into the abrupt aesthetic spectrum of “round peg in a square hole”. 3D printing allows me to work more seamlessly with how parts transition from round tubes to parts and back to round tubes. Every element of a metal bike is based on a circle right down to a water bottle boss. With the introduction of 3D printing into my design tool kit, form and function are now truly one.
Originally all the cable routing came down the underside of the top tube, then split off to the seatstays to go to the rear brake and rear derailleur. Enter droppers that were externally routed. My cable routing could remain neat and tidy along the underside of the top tube but as droppers evolved, internal routing became the standard. This posed a design challenge after building around them for several seasons. Routing remained under the top tube but the internal dropper was routed up the down tube at about 10-11 o’clock just offset from the down tubes water bottle boss. At this point I had been building for over a decade and had enough data to realize that as the bikes were ridden, dust, mud and/or water would collect on the underside of the top tube and slowly wear through powder and finishes (and metal) causing the finish to begin to blister and rust / corrosion to form.
This posed a problem that needed to be addressed. As a designer, you’re taught to observe and collect information to inform your design process. This design process is in many ways identical to the scientific method: Observation, measurement, and experimentation rather than relying on assumptions. What I observed is that due to the nature of a round tube, dust, dirt and muck all accelerated by water collects on the undersides of tubes. Its a cascading effect of sorts. This gets trapped between cables/housing and then abrades the tube and finish under the top tube as the rider either picks up or shoulders the bike or from vibration transmitted through the frame while riding. So it was only natural from a functional standpoint to experiment with locating the cables on the top of the down tube rather than the bottom of the top tube or down tube where muck would wear finishes and collect. By relocating the cables to the top or biased to the side of the down tube (which is round) dust, muck or any combination would naturally want to cascade and roll towards the bottom of the tube. Sort of a self cleaning attribute. Functionally, it would make sense to continue this trend on top of the chainstays but you run into functional restraints on the driveside due to the drivetrain. You could certainly run them through the chainstays but this adds two failure points on a high stress location and for sake of ease of maintenance, symmetry, and aesthetics (aka form) I landed on routing them on the underside of the chainstays where they are functionally optimized for all the above reasons. Some may call this a best practice due to their use case. I simply call this solution “elegant”.
A long time client from Switzerland lives close to the French Alps. His rides, on his singlespeed, routinely saw average elevation gain of 10k. That’s PER ride. (Also of note? His gearing at the time was 34×18…). Every other season it seemed he was emailing me to let me know once again, he’d sheered off another driveside bottom bracket cup. Not as a complaint, but more of a “well, I did it again!” Again, observation, measurement and experimentation creates the necessity for going back to the drawing board. Enter T47. What T47 has that BB30 and its ilk don’t have is simple: THREADS. So you can throw those creaks out the door. T47 also allows you to run a slightly larger bearing appropriately sized for modern mountain bike crank spindles (24mm, 29mm and 30mm) while placing the bearing partially or entirely inside the bottom bracket shell. The bearing and/or cup are parts meant to wear. There’s an argument to be made that this all is eliminated if you increase the precision of the BB bearing race interfaces but this adds expense to the entire scenario. The old adage of “Light, strong and cheap: Pick two” comes to mind. A T47 allows the interface to be precise enough so you keep costs relative while increasing strength and durability. If you’re weight conscious, there’s options out there but most T47 bottom brackets aren’t significant boat anchors (and of all the places where you could place more weight, the bottom bracket is a good spot). A really cool version of the T47 is BB86. This standard is identical in width to a standard 73mm bb shell with external cups BUT BB86 puts the bearings entirely inside the bottom bracket shell, which fully supports the bearing. Here’s a pic below to show those two standards side by side. See how they are identical in width?
For all the reasons above, I’ve moved exclusively to T47 bottom brackets in all my hardtail mountain bikes (unless the client asks otherwise). This moves the bearing inside or partially inside the BB shell while adding more material to a critical location of stress. There really isn’t much of a shoulder or step from cup to thread as compared to BSA bottom brackets and modern requirements for bottom brackets and crank spindles. The above bike is a prototype which the size large stock Marauder is based and uses a 73mm T47. Subsequent client builds have used BB86 T47 shells and there’s a good argument to be made that I might move entirely to BB86 once my stock of 73mm shells reaches zero. But for now, T47 in those two standard configurations rule the day.
Last but not least are the dropouts on the Marauder. Enter the venerable Paragon Machine Works hooded slider. Most likely the most versatile dropout ever designed. (Credit Eric Barr from Ground Up for its conception and Mark Norstad from Paragon for its formalization.) Every bike I’ve ever built using this dropout is forward and backward compatible with every standard the bicycle world seems to cook up: Both Sram/Shimano hanger configurations, Rohloff, Post Mount, ISO, Flat Mount, UDH and of course… Singlespeed. And its for this reason I’ve been using them (there *might be something I’m cooking up here at 44HQ but that will remain and be filed under TOP SECRET).
But its for their versatility I chose them as the dropout for this platform. You pretty much get two bikes in one: Gears for when the going gets tough and you need some range or keep it simple and run it as a singlespeed. And any configuration in-between be it something Shimano or Sram cooks up, Paragon had you covered. I say that in past tense as sadly, Paragon is no more but from their ashes, Firsthand has risen to the occasion and purchased all of Paragon’s IP including their tooling. So most builds from here on out till I run out you’ll see the hashtag or reference to “NOS Paragon”. Never thought I’d be referring to Paragon parts as NOS, but its 2026 and the current timeline demands it, which is a whole other conversation we won’t be covering in todays class. (Perhaps next semester.) But I digress. These dropouts have it all from compatibility to ease of setup, lateral stiffness due to the hooded configuration and loads of adjustment to vary chainstay length if you like to fiddle.
A frequently overlooked detail is the shaping on my chainstays in both steel and titanium. This isn’t all aesthetics (thats more a result of its function) but rather than upping the tube diameter from 22mm to 25mm in Ti or (19 to 22 mm in steel) what I do is ovalize the center section of a 22mm Ti / 19mm Steel tube so it has the lateral stiffness of the next size OD tube. So 19mm steel tube is ovalized to 22mm and a 22mm Ti tube is ovalized to 25mm. I get the lateral stiffness of a larger diameter tube while retaining the relative weight of a smaller tube. All shaped in house to increase tire and heal clearance while optimizing weight and lateral stiffness in a tight package. Combine this with the yoke design for the driveside and I’ve checked all my boxes.
One last driving force behind the Marauder I’m going to coin here is what I refer to as “Progressive Simplicity”. In a nutshell, this is my ethos of constant evolution and pushing boundaries in form and function to achieve the most simple, straight forward solution. Every detail is considered. Every decision is functionally driven with an eye to aesthetic balance. Everything has a reason for being. There is no room for excess in this methodology. If its frivolous, its excluded. If it serves no purpose, its eliminated. To the uninitiated, these are not toys nor are they tools. They are by nature pure utility. They are purposefully designed to be an extension between rider and terrain. The driving design parameter is to bring to bear only that which is necessary for the task. This idea of “stripped down simplicity” is pervasive in all of my work and the Marauder embodies this concept wholeheartedly from axle to axle.
Editors Note: As always, the entire build above has its own album on the 44HQ Flickr account. Check that out here from start to finish. If you’d like to skip to the good stuff, the above images are curated from that same album but the money shots start here. Enjoy.